DIY $220 Wrap Bracelet for $5

135.2K Flares 135.2K Flares ×

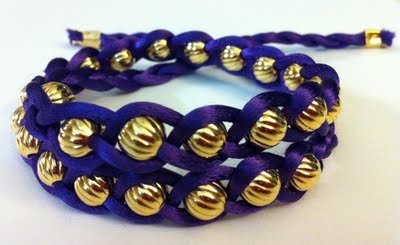
Embellished wrap bracelets are everywhere, and I am kind of obsessed with these colorful Chan Luu ones right now. But $220?

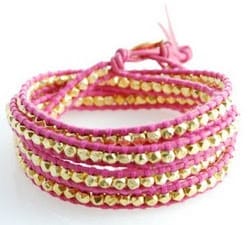
Yikes! I think we can make our own for a wee bit less. Less than $5 in fact!
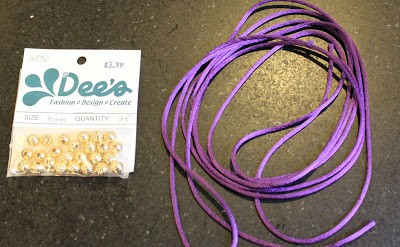
You’ll need:
  • 3 yards of silk ribbon cord. I got mine (purple, of course) at JoAnn’s in the trim section.
  • 2 dozen 8mm gold beads. My beads came from Dee’s but you can find beads with a similar size opening at JoAnn’s, Hobby Lobby or Michaels. If you can’t find them there, these are very similar.

Cut the ribbon into 3 equal lengths. Standard bracelet size is 7 inches so you’ll want it about 29 inches long in order to wrap 4 times.

Start by braiding about 6 inches of ribbon and then secure the end with a rubber band. Anchor the end with something heavy to hold in it place.

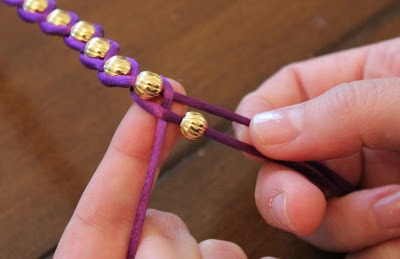
Start braiding in the beads by feeding the ball onto the middle strand and then tightly braiding the other two strands around it. Don’t pull too hard though or the beads will have a tendency to pop out as you go.

Continue feeding beads onto the middle strand until you run out (I had about 25) or until there’s about 6 inches of ribbon left.

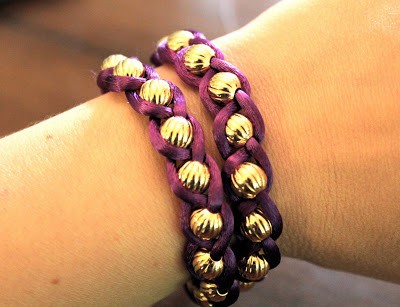
Finish with another 6 inches or so of braiding. Then clamp the ends with ribbon fasteners or just tie it in a knot.

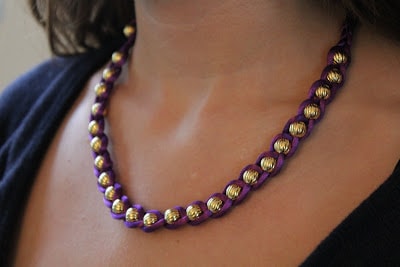
It looks great as a bracelet or a necklace!


Stay Connected

RSSPinterestFacebookTwitter

Comments

  1. I love this wrap bracelet!

  2. I’m new to your blog; hence the late comment here… I love this DIY, especially how it looks as a necklace! It’s a must try!

  3. i really likes the tutorial and it really helps much because it feed me with some more idea and creativity!!!!!!!!!!!

    • I love this, Purple is my favorite cord color, I like to mix it up a bit and put turquoise with it or crystal, or well anything even gold like you have! The tutorial was excellant, I have been trying to fimd a way to use all of my old embroydre floss and I think this may just be the thing I have been waiting for. Thank you so much, your ideas are amazing and fun.

  4. Thanks so much for the tutorial. It was very easy to follow. I didn’t realize not every bead marked 8mm or whatever size, may not have the same size hole. I managed to get the beads through a large enough hole by putting scotch tape on the tip of the silk cord. Hope that helps someone. Thanks again for the tut!!

  5. Mary Gordon says:

    Whats your trick in getting the cord through the beads?

    • If you use, a little bit of, any tpe of clear tape wrapped around the ends of the chord, you should have an easier time getting it through the beads.

  6. Use a large binder clip to clip the cord to a cutting board on one side. That gives you a secure hold and allows you to work on the cutting board in your lap. My cutting board has recessed grooves around the edges to keep beads from falling off.

  7. the bracelet is great but the instructions how to make it is not well done…you should make a short video…I’ve tried to follow the explanation but has not worked…sorry, I love this link but some times things are not explained in clear manner.

  8. When i would try to pull the string s together the beads would just slip out how do u fix this??

    • gerbermom says:

      Hey JC – yes, this can be a problem, just don’t pull the cord too tight or the beads will pop out. You can also dab a bit of glue on the bead after you braid to keep things in place.

    • So how to you fasten the ends, I read about the ribbon fasteners but do you have any pictures of how you finished your ends, this is my biggest road block in making these

      • Hey Amanda – sorry I don’t have a photo! Ask at the craft store for cord clamps, they can direct you to the right thing. Then you can either tie the ends together or attach a lobster clasp if you’d rather do that. Good luck!

  9. this is very cool,I love to make things that are not too compicated while watching t.v in the evenings this will be great,thanks for sharing another great tut

  10. hello from france ,
    i note you a few words to say ” thanks you” for the DIY bracelet .I just bought the pearl , cord and when i will get them i will try to do the same !

  11. Hello,
    We love your detailed and comprehensive tutorial. We wish to feature this page on our blog if permitted and if there will be a slot available for this style/technique.
    Let me know your thoughts.

    Thanks,

    Diybeadingclub.com
    Handmade-Jewelry-Club.com
    Diylessons.org

  12. Great tutorial! Will be pinning for reference =) Haven’t been here in a long time but love the new-to-me blog design. xo

  13. This is FABULOUS!

  14. I love these bracelets too and my daughter is mad on them. Thanks for sharing how to make our own (and giving me the incentive!). Cath.

  15. I’m trying… my beads are smooth and round, maybe thats the problem because tehy wont stay braided…

  16. dodo araneta says:

    pretty…and pinned!!

  17. dodo araneta says:

    pretty….and pinned!!

  18. That is such a great DIY! I’ve been doing my own ones too, out of horror at Chan Luu’s crazy prices :(

  19. I am crocheting a lovely beaded fringe blanket with beading, I was thinking of making your bracelet to match. Do you think it would work with Worsted weight yarn?

  20. Marilyn Cowley says:

    I can’t feed the ribbon through the bead! is there an easy way to do it? Because it does not go through easily and the wholes are the right size. thank you !

    • gerbermom says:

      You can burn the ends with a lighter for just a second so they don’t fray. Or you can use a bobby pin and pull through. Hope that helps!

  21. These bracelets are very nice.

  22. The bracelet is so cute, I tried to make it but I could not get the beads to stay in place while braiding. I would get five done and they would all slip. I got the silk cord and some cute silver beads but then it would not work for me… So sad. If there are any tips you can give to help overcome this issue I would love to get some advice for it thank you.

  23. Where can I order the beads from?

  24. You are truly a excellent webmaster. The web site loading velocity is incredible. It kind of feels that you’re doing any distinctive trick. Moreover, The contents are masterpiece. you’ve done a fantastic job in this topic!

  25. also helps if you tape the ribbon down to the table with masking tape instead of using a heavy object. Cute!!!

  26. Great idea! This bracelet is quite lovely and even when use as a necklace chic and classy to look at. Great tutorial, eh.

    Thanks for sharing,
    Cathy@embroidery digitizing

  27. Please tell me what size beads were used, Im about to give up on this!!

  28. Is there a way to end this other then tying it? Just curious. I made one tonight but with the supplies I have and it turned out quite masculine. I’m going to post it on my blog with a link back to here if you’d like to stop by and check it out (not tonight but soon).
    Thank you! Blessings.

  29. hello. I’m going to try this technique in a bit different way… hope that’s okay?

  30. Dannielle Blauvelt says:

    I’m really wanting to make these bracelets for my friends and am having a hard time finding the silk cord at my local stores so im looking to buy some online. One of the websites i’ve found lists their cord in #’s, based on the diameter in mm. Do you know what size yours is that you used? Also, if anyone has bought online, where did u buy urs? Thanks.

    • Nikki Porter says:

      I was also having trouble. Look in the ribbon section of your craft store (I found at hobby lobby). I used ribbon that is called “decorative trim” and it is 100% nylon. Cost $1.99 and is on sale for 1/2 off right now. Item # 141796. I bought black so this number may be specific for the black color. Happy hunting…it really turns out cute! I know this doesn’t really answer your question about buying online, try searching for 1/8″ nylon.

      • I also bought my cord at Hobby Lobby, but I don’t know what size beads to get?? Can someone please help me??? I’m so excited to try this but I can’t even get started :(

        • gerbermom says:

          The ribbon is commonly called “rattail cord” – you can find it in the trim section of JoAnn’s for 50-99 cents a yard. You can also find large hole beads at JoAnn’s but I’m searching for an online source as well.

          • Kay Angel says:

            Most craft stores carry them, including Michaels and Total Crafts. Online, try ebay or Fire Mountain Beads. Look at the size of your cord and get beads with a slightly larger hole in them. If you buy local, take your cord in and hold it up next to the beads. Should be fairly easy to see if it will fit.

  31. Love these! I am definitely going to make one and will post the results :)

  32. Love your project! I just wanted to let you know that I featured it today on my blog Sew Rockin’. You can check it out at: http://www.sewrockin.com/2011/12/09/you-sew-rock-me-fridays-8/

    Awesome job, I can’t wait to see what else you come up with!

    Jamie @ sewrockin.com

  33. Those bracelet and necklace is so lovely and I’m mad on it’s design. Soon I’m going to grab it..!

  34. It looks like silk cord (also referred to as “Rattail” or rat tail). It does come in different thicknesses if you are having difficulty with the cording going through the beads. There is a tool to increase the hole size of beads if you are so inclined. I can’t wait to try this.

  35. The original $220 version is actually not that hard to make. 10-12 feet of cord (I work at a bead store where we sell cord for $0.15 a foot), two or three strands of basic gold spacer beads or other small beads (price depends on materials: $ stones > $ plated metals or glass), some string or thread, and a button or toggle for the clasp is all you need. I’ve made several of these, and they are pretty easy (though time consuming).

  36. I’m having trouble getting the beads stay in place while braiding! The cord keeps slipping when I pull tightly to secure. Any suggestions? Looking forward to sharing these with my best girlfriends over Christmas – thanks for your help!

  37. Great and easy…I will try it! Thank you for this idea!

  38. I love your site.It is fantastic.

    I cannot access ‘ You might also like:’ links though. Is my computer or are the links down?

  39. Super cute! As always, you have awesome ideas.I love This is fantastic bracelets!!

  40. I tried these and was disappointed. I bought lots of silk cording from my local craft store. Then I bought some pretty beads. And I tried it out and found that the silk cording is too large to go through the opening in the beads. I searched all over the place for beads with larger thread holes and couldnt find any. So how did you manage to thread the beads onto the cording? Where did you get your cording?

    • I had this exact same issue! I bought two different size beads (biggest openings I could find) Very frustrating.

  41. Wow this is so Fantastic!! Love it!
    Hugs
    Anne

  42. Sarah Stephens says:

    Was that ribbon or cording you used? I’m all about trying this!!! Thanks for sharing.

  43. Hi there!
    I desperately want to make this! I looked all over town today for beads that size and didn’t find anything. I’m going to order online. I did find the ribbon though. My next question is what size clamps did you use? could you send me a link of the kind of clamp so i know i’m getting the right kind? i’m extremely uncrafty, but i’m trying!

  44. interested in the ends and how to tie off and it looks like cord not ribbon correct?

    • henryhappened says:

      Hi Elizabeth – I clamped the ends and just tied them off. But you can easily use a clamp with a ring and then attach a lobster claw closure with a jump ring. Hope that helps!

      • Where did you purchase the beads and clamps? I’m having a very difficult time finding ones that have a large enough opening.

  45. Ellen Jones says:

    I was also wondering how you end the bracelet to attach on wrist. Help. That looks like the cord you can buy, is it? Want to make some of these for granddaughters and daughter. Thanks for showing. Awesome.

  46. Gildalind says:

    Very beautiful!
    Thanks

  47. What a clever and beautiful take on the braided bracelets. This is really beautiful!

  48. Luv this – I've seen in stores with crystals that are expensive – going to make these this weekend!!

  49. LOVE this DIY! I'm going to try it.

    I also featured it on my blog: http://blog.shopdirtylaundry.com/posts/2011/7/29/

    I hope you like it!

  50. How do you fasten the finished bracelet? Can't wait to make one!

  51. Where do you find the ribbon? I can't find it.

    • henryhappened says:

      I believe I got mine at JoAnn's in the trim area. Let me know if that helps!

      • Hi – I went and bought so much cord today and don’t think it was the right one :( I know you said you got yours at JoAnn’s is it called Silk ribbon cord? Is there a certain size I need to buy? I know I need 3 yards for each bracelet but is there any other dimensions I need to know so I can make sure I get the correct cord?

        Cannot wait to make these, have everything sitting here staring at me lol w/ a bunch of great colors so hopefully I can find another project for those. I know a bunch of people have asked so if there’ anyway you can post a link or give more info it would be greatly appreciated! You also used 8 mm beads to correct?

        Thanks for your help, the braceletes are amazing!

        THANK YOU!!!

        • gerbermom says:

          The ribbon is commonly called “rattail cord” – JoAnn’s or Hobby Lobby sells it in the trim area.

  52. WOW, this is amazing. I'm making one this weekend. I've decided :D

  53. This is fantastic! Thanks for sharing!!

    x
    Michelle
    <a href="http://www.michellesstylefile.blogspot.com” target=”_blank”>www.michellesstylefile.blogspot.com

  54. I can't see how the bracelet attaches to the wrist. Could you please explain? Do you just tie the braided ends together? Thanks for sharing!

  55. I love the necklace!! So much better than a $200.00 one!!

  56. Having the hardest time finding the right beads and cording to make this! Any tips on where to buy? Tried Michael's and struck out. Thanks!

    • I had to order online for my materials. Couldn’t find what I needed at any of the local stores like Michaels and Joanna either. I typically rack up at the bead shows as well! I hope this helps.

  57. So cute and so simple to make! Thanks for linking up!
    Crystal

  58. Very awesome! I love making things for less! I have a link party called Make it for Less Monday..you should post up next week! <a href="http://www.simplycadence.blogspot.com” target=”_blank”>www.simplycadence.blogspot.com! Hope to see you there!

  59. I like you version actually better!! Love this.

    -newest follower

    -Lindsay
    Delighted Momma

  60. Very beautiful! Can you please tell me if this is truly ribbon or silk cord? I don't think I've seen ribbon like this before. Thank you very much!

  61. I think I recognize the model! Beautiful!

  62. seriously fabulous!
    I just started a linky party this past Tuesday. It was a great success with over 50 link ups! I would love it if you would participate tomorrow! It's called $10 Tuesdays and it's for things that cost less than $10 and take 20-30 mins (ish) to complete. I love inexpensive and quick projects and I'm guessing others will too ;) Thanks so much for considering.
    Tina http://sweetfloweret.blogspot.com/
    PS. I'm GIVING away 50 button pony tailers this month! Come visit and claim yours ;)

  63. My girls are in their bracelet phase and would love to make these. Thanks!

  64. Nikki B says:

    wow…super cool! I love it! I want to do one too!

  65. This jewelry is fabulous! I love your blog and many of your projects. I hope you don't mind that I'm showing off your fun feathered hat on my blog today. I totally wish I had found it sooner and I would have made one for myself!

  66. writingsfrom50pluslady says:

    WOW ! I am impressed,all the items look great,but I have no such talent to create them.
    Have a great day.

  67. Cute. Thanks for the tutorial!

    • kathy r says:

      I like the way you made this using a braid. I made one using a different technique, but I like the look of yours better. It seems people are having trouble with supplies. I went to WalMart and bought leather cordidng and cute ponybeads. Very cheap and came out fine. I fastened mine with a button attached at one end and a loop made out of the leather cord on the other end. Good Job!!

      • gerbermom says:

        Thanks for the supply suggestions! I updated the post with an online bead source – although you can get similar beads at Hobby Lobby and Michaels. But Wal-Mart is great too!!

Trackbacks

  1. [...] 1. DIY Felt Heart Handwarmers | 2. DIY Friendship Bracelet [...]

  2. [...] {Wrap Bracelet via Henry Happened} [...]

  3. [...] you’ve shelled out about $5. (Why are all my projects $5? It’s not a Lincoln conspiracy, I [...]

  4. [...] bead braceletWrap bracelet Hex nut braceletSingle braided bead bracelet [...]

  5. [...] 3- Une tresse avec 3 brins de coton huilé et des perles voir ici pour le tuto [...]

  6. [...] via Benzer İçerikler:KAZAKTAN SEPET ÇANTA YAPILIŞIKENARLARI YAKILARAK GÜL YAPILIŞIKEÇE HAYVANLARIN RESİMLERİKEÇEDEN RÜZGAR GÜLÜ TOKA DİKİLİŞİ,YAPILIŞIKEÇE KUMAŞINDAN SAÇ TOKASI ÇİÇEK YAPIMITAÇ VE TOKA SÜSLEMESİNDE KULLANILAN KEÇE ÇİÇEKLERİN YAPIMIÇORAPTAN OYUNCAK KELEBEK YAPIMIYUMURTA KARTONUNDAN KİRPİ YAPILIŞI [...]

  7. [...] Dit is trouwens een leuk alternatief! [...]

  8. [...] this braided jewelry with beads look nice? And it doesn’t seem too hard to make it ;-) [...]

  9. [...] dieser geflochtene Perlen-Schmuck nicht hübsch aus? Und es scheint gar nicht so schwer zu sein, ihn herzustellen ;-) [...]

  10. [...] bracelets are featured on the DIY website, http://www.henryhappened.com/how-to-220-bracelet-for-5.html, consisting of full instructions, materials and costs for creating a gimmick style this [...]

  11. [...] Wrap bracelets are super quick and very stylish! I’ve seen them in magazines and on the arms of celebrities. [...]

  12. [...] DIY $220 Bracelet for $5 – henry happened | henry happened 1237 42.2K share 586 [...]

  13. [...] braided bracelets before – even a necklace – so I figured how hard could this be? Turns out it’s [...]

  14. [...] Apparently, wrap bracelets are popular.  I made one and totally fell in LOVE.  Here is the tutorial over at Henry Happened.  I had so much fun making mine.  Here’s what I [...]

  15. [...] yesterday I came upon these instructions for a beaded wrap bracelet from Henry Happened, based off the exact Chan Luu bracelets I’ve been lusting [...]

  16. [...] Braid Wrap Bracelet Henry Happened, photo and craft [...]

  17. [...] 4. Make a beaded wrap bracelet, using this tutorial from Stephanie’s blog, Henry Happened. [...]

  18. [...] Stephanie from Henry Happened made this Braided Bead Bracelet. [...]

  19. [...] the web.  They all were really fun to make and turned out nicely.  The first bracelet came from here.  I made mine long enough to wrap around my wrist twice.  My very favorite bracelets are shrinky [...]

  20. [...] sont entourés de chutes de tissu chez MONDOCHERRY, créés avec des perles ou du fil mouliné chez HENRY HAPPENED et [...]

  21. [...] yapabileceğiniz bir bileklik modeli. Yapımı burada. Ayrıca bkz : Zincirli Bileklik [...]

  22. [...] Woven friendship bracelets from Michael Ann Made ♥ Anthropologie-esque from Yellow Blackbird ♥ $220 bracelets for $5 from Henry Happened ♥ Friendship Bracelets and Wrap Bracelets from HonestlyWTF. In fact, their [...]

  23. [...] I’m going to make some of these bracelets. [...]

  24. [...] with on Pinterest this week… Source: pinkandgreenowl.tumblr.com via Amy on Pinterest Source: henryhappened.com via Amy on Pinterest Source: vandavintage.tumblr.com via Amy on Pinterest Source: [...]

  25. [...] how to | $220 Bracelet for $5 | henry happened. [...]

  26. [...] het nog eenvoudiger? Vlechtwerk van Henry Happend. Blog this! Recommend on Facebook Buzz it up Tweet about it Subscribe to the comments on this post [...]

Comments

*

privacy policy
135.2K Flares Twitter 33 Facebook 937 Pin It Share 126.6K StumbleUpon 7.6K 135.2K Flares ×